I was so happy this week to finally get back into the garage after almost a month to make this fun jewelry cabinet!

Between snow days, freezing cold days, busy days, sick days, cranky days, there just weren't many building days! But this week I finally got to Tart Lumber to spend my Christmas gift card (thanks to my lovely in-laws!) on some nice lumber to get back to work! I have quite a few projects on my to do list and have been anxious to get at it!

read more
Between snow days, freezing cold days, busy days, sick days, cranky days, there just weren't many building days! But this week I finally got to Tart Lumber to spend my Christmas gift card (thanks to my lovely in-laws!) on some nice lumber to get back to work! I have quite a few projects on my to do list and have been anxious to get at it!
There's nothing glamorous about driving a mini-van, but check this out! That's a lot of lumber, some 10 ft long, and I closed the trunk with no problem!
The first thing I chose to try was this fun hanging jewelry cabinet. A friend from church asked me for a hanging jewelry cabinet, which led me to Ana White's site, as usual, to look for plans. I found this and fell in love with it. Since it wasn't quite what she had in mind, I made one for myself instead! (But don't worry, we'll find something for sweet Pj. :) )
I was so excited to dive back in, that I didn't take any pictures until after I had the frame and door built! But that was partly because they were so easy to do!

The plans suggested using the Kreg Jig to make pocket holes for the frame, but I decided to use my new countersink drill bits (another Christmas gift - thanks, Brad!) and just screw the frame together from the outside. I love the strength of pocket holes, but I haven't mastered covering them and I didn't want to be able to see them inside or under the frame.
I did use pocket holes for the door, and my Kreg jig made that very easy. And the joints look so clean on the front this way!
I decided to paint at this stage before adding the wire mesh and hinges, so I paused here to fill holes and sand. I got this new Elmer's wood filler that starts out purple and turns white when it dries - I love it! It dries quickly and the color change makes it easy to know it's ready to be sanded.


Since I planned to hang this cabinet in our bedroom, I painted it the color of our accent wall. (See, saving all my paint comes in handy! :) )


You see the chicken wire attached to the door in that picture (left over from the Christmas card frame), but I didn't like the way that looked, so I swapped it out tonight for a square 1/2" wire mesh instead. I used tin snips to cut the wire - much easier than the wire cutters I started out with! Then I just used my craft stapler to attach the mesh to the back of the door. (and a flat head screw driver works great for removing the staples if you change your mind like me! Just don't forget your safety glasses!)
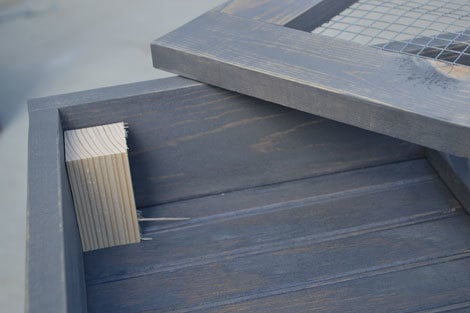
To attach the hinges, I used Ana's great tip of putting blocks inside the frame to hold up the door - so easy to screw everything in place that way.

I opted not to put a back on my cabinet this time, but have fun ideas for including one another time with some sort of stencil or pattern painted on it to show through - how cute would that be?!
I added nails to the cross pieces for hanging necklaces and bracelets. I didn't measure this, trying to let go of some of my perfectionist tendencies, and just put 6-8 nails on each row. Then I just pre-drilled holes through the cross pieces to screw the cabinet into the wall.

The perfectionism came back with a vengeance when I hung it up for the first time last night and found that in all my careful checking for square all the way through the project, I still messed up when I attached the top and it looked crooked once it was up. It's amazing how quickly one can swing from proud of something to embarrassed by it - from empowered to imposter. Or maybe that's just me. :P I left it up last night but stewed over how to fix it until I took it down this afternoon. I popped the top back off (it was nailed on), sanded the one side down, did some other minor adjustments, and nailed the top back down. There's still a small gap, but I'm trying to live with it. ;) The struggle is real!

So there it is! Dangle earrings hang on the front of the door, necklaces and bracelets on the nails. I'm thinking about ways to incorporate something for post earrings and then I'll make one for the girls! My 7 year old asked as soon as she saw it, "Was this hard for you to do? Could you make 2 smaller ones, one for each of us?" It's nice to be appreciated. :)


I was so excited to dive back in, that I didn't take any pictures until after I had the frame and door built! But that was partly because they were so easy to do!
The plans suggested using the Kreg Jig to make pocket holes for the frame, but I decided to use my new countersink drill bits (another Christmas gift - thanks, Brad!) and just screw the frame together from the outside. I love the strength of pocket holes, but I haven't mastered covering them and I didn't want to be able to see them inside or under the frame.
I did use pocket holes for the door, and my Kreg jig made that very easy. And the joints look so clean on the front this way!
I decided to paint at this stage before adding the wire mesh and hinges, so I paused here to fill holes and sand. I got this new Elmer's wood filler that starts out purple and turns white when it dries - I love it! It dries quickly and the color change makes it easy to know it's ready to be sanded.
(ignore that I kind of gobbed it on there...)
All dry!
Since I planned to hang this cabinet in our bedroom, I painted it the color of our accent wall. (See, saving all my paint comes in handy! :) )
You see the chicken wire attached to the door in that picture (left over from the Christmas card frame), but I didn't like the way that looked, so I swapped it out tonight for a square 1/2" wire mesh instead. I used tin snips to cut the wire - much easier than the wire cutters I started out with! Then I just used my craft stapler to attach the mesh to the back of the door. (and a flat head screw driver works great for removing the staples if you change your mind like me! Just don't forget your safety glasses!)
To attach the hinges, I used Ana's great tip of putting blocks inside the frame to hold up the door - so easy to screw everything in place that way.
I opted not to put a back on my cabinet this time, but have fun ideas for including one another time with some sort of stencil or pattern painted on it to show through - how cute would that be?!
I added nails to the cross pieces for hanging necklaces and bracelets. I didn't measure this, trying to let go of some of my perfectionist tendencies, and just put 6-8 nails on each row. Then I just pre-drilled holes through the cross pieces to screw the cabinet into the wall.
The perfectionism came back with a vengeance when I hung it up for the first time last night and found that in all my careful checking for square all the way through the project, I still messed up when I attached the top and it looked crooked once it was up. It's amazing how quickly one can swing from proud of something to embarrassed by it - from empowered to imposter. Or maybe that's just me. :P I left it up last night but stewed over how to fix it until I took it down this afternoon. I popped the top back off (it was nailed on), sanded the one side down, did some other minor adjustments, and nailed the top back down. There's still a small gap, but I'm trying to live with it. ;) The struggle is real!
So there it is! Dangle earrings hang on the front of the door, necklaces and bracelets on the nails. I'm thinking about ways to incorporate something for post earrings and then I'll make one for the girls! My 7 year old asked as soon as she saw it, "Was this hard for you to do? Could you make 2 smaller ones, one for each of us?" It's nice to be appreciated. :)


