Saturday, April 30, 2016

Floating shelves in the kitchen!

When we first moved into our house in 2012, the kitchen unexpectedly became one of our first big projects. We had intended to update it "at some point" but after living in it for a few weeks, it quickly moved to the top of the list! (terrible layout was causing so much frustration, this was kind of like a quality of life upgrade!)

We opted for Ikea cabinets and decided to do the main part of the kitchen and leave the refrigerator wall alone for the time being until we were really sure what we wanted to do over there (and until we had more money!)

This cabinet over the "peninsula" was designated the home for wine glasses and tea. It worked out pretty well, but wasn't overly easy for me to access much above the bottom shelf since I was reaching over the counter and around the door... so this fall, I had an idea. What if I take down the cabinet and replace it with floating shelves? Of course, I didn't want to lose a cabinet, but there was room for it on the half of the kitchen we didn't renovate, so I could reinstall it there!


Brad was not completely on board, mostly afraid that we'd end up screwing up a cabinet in the process, and since Ikea has discontinued our cabinets, his point was valid. Buuuuut, I did it anyway, I just waited until he wasn't home. ;) That's kind of my routine...  but it's ok because it worked! And as usual, Brad was happy with the result and pretty relieved to not have to be here when things were possibly falling apart. ;) Everybody wins!

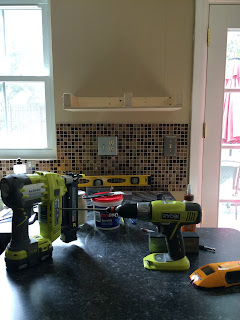
But of course, we need some progress pictures! Here's the before. 


I started by emptying it, of course, and then took it off the wall. Ikea makes this process pretty easy. I just had to unscrew it from the rail and muscle it down. It was ok to skip the gym today!


Here's a picture of the wall where the cabinet is headed. It's pretty sad "before".


I slid the refrigerator over a few inches, rehung the rail, and got the cabinet up. This part would have been easier with help, but I'm not patient. It took a couple of adjustments to get things right, but it worked!

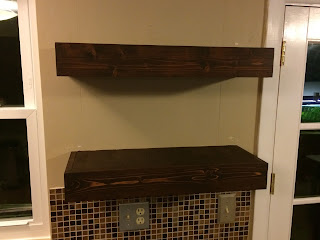
Now it was time to attack the shelves. I patched, sanded, and painted the wall and then got to work. I used plans from Shanty-2-Chic for these shelves. 


I stained it in place.


Then polyed with the Triple Thick Poly. Hard to be patient why that dried...


I added hooks under the bottom shelf for coffee cups to leave room for my wine glasses in another cabinet. Now it's useful for coffee and the storage and pretty with some decorative items. 


Since this is the view we have right as we walk into the house, we love the openness that the open shelves provide. 


 I love when my plans work out! :)


read more

Thursday, March 3, 2016

Coat Closet Mudroom

Do you have one space in your house that you're just never satisfied with? For me, it's my coat closet. I have changed this closet more times that I can count!

I thought I had solved it with my first build of a tall, narrow shoe shelf with hooks above and to the sides of it. It worked for a while, but the kids, and so their coats, have grown! And the weather in Northern Virginia this winter has been having an identity crisis and so we need different jackets from one day to the next! Clutter, crowding, ACK!

ANYway, more thinking and staring has been happening, with the vague plan of trying to do something in there but without much of an idea of what I want to do.

Then I saw this pop up on my Pinterest feed and the wheels started turning. What if I modify this to make it fit the coat closet?! I loved that it provides space for shoes without wasting the rest of the depth of the floor space. And I loved that I could stash stuff in the back depending on the season - snow gear, soccer gear, swim gear, whatever!


When I measured and found my space to just be about half the size of Ana's, I was convinced. Easy mods, organized and hopefully more spacious coat closet, and even a place to sit to get shoes on and off!

I had to plan for the doorway opening that is more narrow than the actual closet. I learned from an earlier failed attempt at getting a shelf system in there that a shelf as wide as the actual closet would never actually get into the closet and be able to turn into place. So this build would have to be assembled in place. In the closet. With no closet light. CHALLENGE ACCEPTED.

Empty it, pull off the moulding (not pictured), ready to go!


I started by cutting all of the pieces I would need for the shoe shelves and storage area. I planned to assemble this with Kreg joinery, so I drilled the pocket holes at this point.

Next I stained everything (Varathane Dark Walnut stain to match the stairs) and applied polyurethane to both sides of all of the pieces.

I don't think I have ever said how much I love this poly, but seriously - this stuff rocks. Super thick application, one-and-done on coats, and a smooth finish without all of the pickiness of regular poly. Seriously, I can basically just slap this on, go over sections to smooth when I need to, and it dries quickly and looks great! If you've worked with regular poly with all of it's bubbles and lines and multiple layers, you will understand how awesome this is! Varathane isn't paying me or anything, I just really love this stuff!


Once all of the pieces were dry, I headed into the closet. There aren't any pictures of the construction here - I basically followed Ana's plans and swore a lot at the frustration of building in an area only 1.5" wider than the piece. ;) But it came together!


I put up the coat rack piece next and then on to the top cubbies. Same process, similar swearing. Installation of this part was a bit trickier - this closet is really odd and is lacking in studs. There are only two on the whole back wall and they're both on the right side! And the side walls are basically devoid of studs. So weird. I decided to hang it with L-brackets to make it easiest. Because there are only the two studs, I put L-brackets on the tops and bottoms just to have more attachment in the stronger areas.


When I was antsy during one of the drying stages, I made this little key/glasses/wallet hanger for one of the side walls. We'll try out this prototype for a while and if it works well, I'll add it to my Etsy shop soon!


All done!  (horrible lighting to try to take this pictures! Sorry!)


I'll explain how I did the plank wall later if anyone is interested. I'm planning to do something on the side walls too, mostly to cover all of the anchor holes from previous versions of the closet, and to cover the paint without painting. ;) Any ideas on what I should do on the sides? Plain (stained) plywood sheets? More planks? Something else?


I noticed I ended my last post about this closet with "maybe it will stay like this for a while now" and now I'd like to say it again, but this time it had better because it's built in! These will have to be taken apart to get them out now! ;)


p.s. - Did you notice my girls' cute little purses in the closet? Don't you just them?! They're custom made by my super talented sister-in-law, Amy. You can find her here and custom order your own! :)

read more

Monday, February 8, 2016

Stair case renovation - part one

When we moved into our house and saw the carpet on the stairs and the floor upstairs, it was on our list of things to change ASAP.  


(Of course, once we were in the house, we realized how naive those walk-through lists are! So many unexpected items get added once you move in and the projects on those early lists get pushed to the back burner (or right off the stove!), amirite?!) 

So the carpet remained until last winter. When the allergist told us that is was time to get it out of our daughters' bedroom to help with our youngest's allergies, we decided to have laminate floors installed throughout the upstairs. 

That left the stairs... they could have stayed carpeted - but I can't often leave well-enough alone. Having them finished professionally was financially out of the question and I had been eyeing all of the great DIY stairs renovations that are all over the internet. They make it look pretty easy! 

Brad was less thrilled with the idea of doing anything to the stairs - a little (lot) less excited by the DIY blog posts I was showing him, and a lot less convinced that it wouldn't be very difficult. He had other good reasons and valid points too - neither of us have ever done anything like this, we had very little clue what it would entail or what we would find under the carpet (though I did cut and peel back a small section to peek), we could end up tearing off the carpet only to find that we've caused a very expensive problem that we can't fix, etc, etc.  

hmm...

So, I did what I often do when faced with this sort of problem... I waited until he was out of town and did it myself! :) 


He was leaving for a week and we were facing some snow, so what better time, right?! 

We had a LOT of snow days while he was gone (like, a LOT - like, all of the days and then some), so I enlisted the help of my littles to tear the carpet off the stairs. I love including them in big projects when I can - GIRL POWER! 

So, we threw pants under our pjs (in the middle of the day - whatever) and got to it! 


I used a utility knife to slice across the top riser and we started yanking! It was so satisfying! 

... also, there was no turning back now. 


The next stage was removing all of that padding. Much less fun or satisfying and my helpers disappeared. ;) This stage left a huge mess. I used pliers and the back of my hammer to pull out about 754,038,453 carpet staples. Good times. 


The stairs were a mess since I'm sure the construction workers who built the house knew the stairs would be covered. There was writing, spilled paint, spilled coffee, and who knows what else. And after my staple-pulling, there were a whole lot of holes! I also found that some steps were in much worse shape than others. Brad may have been a little bit right...

I fantasized about just buying stair caps to install over these, but pricing them out convinced me to just grab the wood filler and get to work!


Once the stairs were safe and usable, I left them alone since the flooring guys were coming to install the laminate. No sense in fixing them up and then having them trampled! And, bonus - they took this carpet away with the rest from upstairs! Thanks, Empire. ;)


But then came the sanding. Oh, the horrible job of sanding these steps. I don't want to talk about it...


...but it was effective! They're starting to look much nicer!


Brad came home at this stage and was happy - mostly that he didn't have to be here during the insane mess, I imagine! ;)


Phew, I'm exhausted just writing about all of this part. In my next post, I'll detail how I stained and finished the steps. And I'll tell you why, to this day, there are two dog prints on every other step... 

stay tuned!

read more

Wednesday, January 13, 2016

Mosaic Top End Table (and ukulele storage!)

I'm finally writing about this project I build last spring!


I posted it on instagram way back when I finished it and said "someday" I'd get back to blogging... 29 weeks later, here we are!


So, as you may know, my husband has a touch of Ukulele Acquisition Syndrome. Do you know anyone afflicted with this? (Symptoms include responding to the question, "How many ukuleles do you need?" with "One more.")  His condition led to the clutter problem we started having last year which led to the creation of the ukulele hanger that has become so popular on my Etsy shop

Well, the uke hangers (yes, we have multiple now...) are great when he actually hangs the ukes, but in the dry winter, he keeps them in cases with humidifiers over night. So the clutter problem reappeared, this time with cases on the floor.

And we wanted an end table. ;)

Enter this modification of a shoe shelf posted on FixThisBuildThat.com.  I altered the plans slightly for size and skipped the step of making the shelf adjustable. Construction was pretty straight forward and using my Kreg jig for pocket holes made it easy (and strong!). You can see the pocket holes on the top waiting for the table top! 

If I had been smart, I would have waited to put that shelf in until after I had attached the top - it was a little challenging getting my drill in there at the end! I did think ahead enough, though, to stain the inside at this point. I used Weathered Gray stain by Varathane. I love this stain - wipe on, wipe off the excess, done! I also applied a coat of Varathane's Triple Thick poly since the cases would be sliding in and out a lot. I love this stuff too! It goes on thick and is very forgiving (not as many worries about bubbles, etc, like regular poly.) One coat of that and I was back to work!


Next, I attached the legs and framing pieces. I made the these sit up slightly higher than the top of the plywood sides to be able to conceal the edges of the table top later.


For the outside of the table, I used a layered stain technique. Sadly I don't have a picture of this part, but I'll do my best to explain the process. First, I stained the whole thing with Dark Walnut. Then, working quickly, I used a paper towel to wipe on a small amount of Weathered Gray and immediately wipe it back off. I worked in small sections so that the gray stain didn't have much time to penetrate the wood. I've used this technique on other pieces and just love the dimensional color it can give. 

Now it was on to the fun part! I had been eyeing different kinds of planked table tops and decided to give it a try, but with a mosaic-like design. To start, I measured and cut the first 3 pieces of my 1x4 board. I laid them out on the plywood base I had cut to fit the table. It was fun playing with my Ryobi miter saw to get the angles I needed! I love this saw!


I didn't have too much of a plan for this part, so I just cut pieces to fit as I went along.


Already in love!

And then onto staining! I used all Varathane stains - Dark Walnut, Weathered Gray, Vintage Blue, and Sunbleached. On most of the planks, I washed over them with a layer of the gray to get the tone I was going for. (The blue especially - you can see how bright it is in the can, but how muted it looks on the table.)


I laid them all out and then went through with wood glue and a couple of strikes on each plank from my Ryobi Airstrike Nail Gun. (swoooon....)


I was so happy with it at this stage that I just kept taking pictures. :)


Once it was all together, I realized that the edges of the boards on the table top did not all line up perfectly with the side framing pieces. A couple of them were just a little short. Now, I know this will surprise everyone (ahem), but this drove me crazy. And made me angry. Like a lot.

Eventually I came up with a solution. I decided to line the outside of the top with pieces of 1/2"x2"... BUT I didn't have any in at the moment... BUT I did have the large paint stir sticks from Home Depot... and they're basically the same size... so yeah. The (no longer a) secret is that the top of my end table is lined with sanded paint stir sticks. ;) We'll call it being resourceful. I stained them to match, glued and nailed them on, and brought the whole thing in!


(from this angle you can see the bottom skirt piece that I forgot to attach..oops!)

Once it was inside, I protected the top with multiple layers of triple thick poly - I especially wanted to be sure that the cracks between the planks were full. If (when) a drink gets spilled on this at some point, I would hate to have the liquid seep between them and ruin the table!


Here it is loaded up! We finally have an end table! And the cases are off the floor! Hooray!


Thanks for reading! 

Check out my Instagram and let me know if there's a project you'd like me to write up next! I have a lot of catching up to do! :) 


read more