I asked Brad to pick up a 2x6 on his way home and I got to work!
I cut the wood using my circular saw. On such a thick piece, a miter saw would have been easier, but I'm currently between miter saws. ;) I positioned the ledges, predrilled holes through the back of the larger piece, glued and screwed. Whew, building phase complete! ;) I sanded the edges and corners with 120 grit sandpaper and got ready for color!

Look at the beautiful wood grain! When I saw that, I decided to stain these instead of painting. I've been anti-stain since my troubles with my console table, but since then I have learned a lot about staining and after staining our stairs last month, I've renewed my confidence!
I couldn't decide quite what I wanted for color, but thought something in the gray family would be nice. I wanted something weathered looking without going too rustic. Googling around led me to BeachBumLivin and his tutorial on layering stain. How cool!
I worked on the back and sides of the sconces first. I figured I'd save the most visible parts for last so I'd have more practice by the time I did them. ;) I started with a layer of Varathane Kona stain. Beachbumlivin said to leave it on to dry and then sand it lightly, but I'm not always that patient... it was actually really hard to just trust the process and wait through it - life lessons through woodworking, eh? But I did leave the Kona stain to soak in for about 10-15 minutes before wiping it off.

I sanded it lightly with 220 grit sandpaper, just in some spots to bring out that pretty woodgrain. I repeated the whole process with the Kona. Not sure why this scared me so much, even after testing it out on a scrap piece! I was just already in love with the sconces and was afraid I'd screw them up! I actually set a timer and went inside so I wouldn't be tempted to wipe the stain off early!
BeachBumLivin said he went straight to the Sunbleached stain from here, but after testing this out on a scrap piece, I decided to try layering in Weathered Gray first (also both Varathane). I loved the way it looked! Different grains of the wood picked up different layers of the stain and it looked really cool. I didn't take pictures in between these steps because both the gray and the sunbleached only sat for a minute before I wiped them off. I lightly sanded any areas that took up too much of one color or another and I was so happy with the results!

I let it all dry for an hour or so and then turned them over to work on the front. Here's a picture that shows the Kona alone next to the layered stain.

I just love the result!!


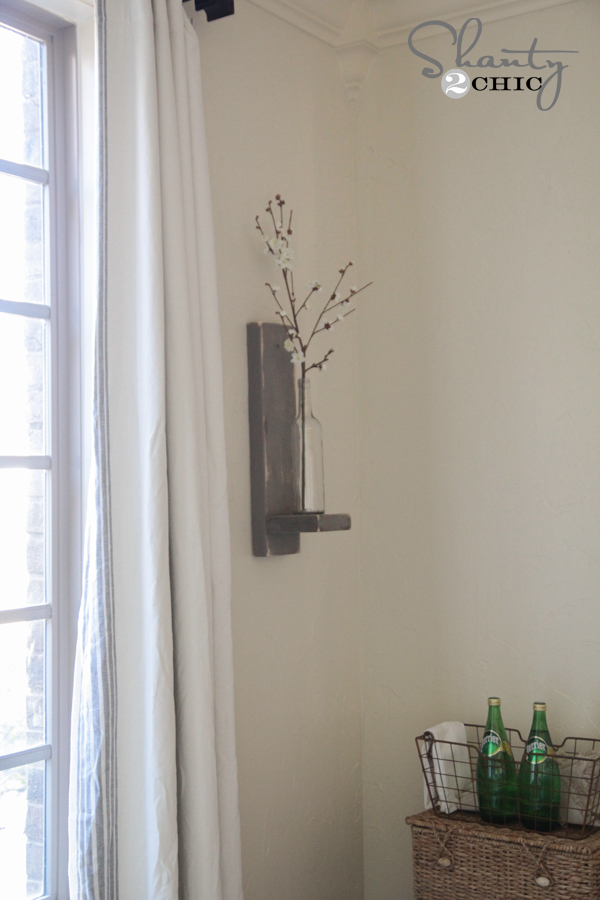
The Shanty-2-Chic sconces use wine bottles, which I had planned to do. I soaked the empty wine bottles in a baking dish with a couple of tablespoons of baking soda dissolved in water. Thirty minutes in the water and the labels peeled right off!
After looking at it, though, I decided my ledge might be too high for the wine bottle and found vases as an alternative. I couldn't decide which I liked better and since these are being donated to a silent auction, I decided to poll my Facebook friends to see which design was more appealing to most people.


The vase was the overwhelming favorite, so for this time around, I went with that. I used Gorilla Epoxy to attach the vases securely to the ledges. Keeping it real in my kitchen...

I just had to hang them in my house for a minute before I take them over to church. Use your imagination and picture candles or pretty flowers in them! What would you fill them with?


No comments:
Post a Comment